 how-to
Why Metal Siding Coatings Fail Prematurely
Table of Contents
- Why Metal Siding Coatings Fail Prematurely: The Core Causes
- Signs of Coating Failure on Metal Siding
- Metal Siding Surface Preparation Before Painting
- Primer Selection and Metal Substrate Compatibility
- Repainting Aluminum Siding: When and How
- Metal Coating Maintenance and Inspection
- Environmental Factors: Heat, Moisture, and UV Exposure
- Frequently Asked Questions
Last Updated: October 21, 2026
Why Metal Siding Coatings Fail Prematurely: The Core Causes
Metal siding coatings fail prematurely when the fundamentals are ignored. We've seen countless projects where a high-quality paint system was applied to a poorly prepared substrate, only to peel away within months. The reason is straightforward: why metal siding coatings fail prematurely comes down to three core issues that compound each other.
The failures encountered in metal siding projects often follow predictable patterns. Most aren't due to paint quality; they're due to what happens before the paint ever touches the metal.
Inadequate Surface Preparation and Contamination
Surface preparation is where most projects fail. A contaminated substrate will reject any coating, no matter how premium. Oil, grease, oxide layers, and mill scale create a barrier that prevents adhesion.
Many contractors rush this step. They pressure-wash the surface and call it done. In reality, the metal needs degreasing with a solvent-based cleaner, followed by removal of all rust and oxidation.
Common contaminants that cause failure:
- Machine oil and hydraulic fluid from manufacturing
- Oxide layers and mill scale on bare steel
- Rust bloom and surface corrosion
- Dust, dirt, and atmospheric deposits
- Previous failed coatings that weren't fully removed
Without removing these, the new coating sits on top of contamination, not metal. Adhesion fails within weeks.
Primer Incompatibility and Poor Adhesion
Primer selection determines whether your topcoat sticks. Using the wrong primer for your substrate is like painting on ice.
The metal substrate matters here. Aluminum requires different primers than steel. Galvanized steel needs a primer designed for zinc-rich surfaces. Using a generic primer across all metals is a common mistake that leads to adhesion failure and coating delamination.
Primer compatibility issues:
- Generic primers don't bond to all metal types equally
- Primers designed for wood or drywall won't work on metal
- Incompatible primer-to-topcoat combinations create weak interfaces
- Insufficient primer thickness reduces adhesion strength
We recommend primers specifically formulated for the metal type you're coating. Steel needs a rust-inhibiting primer. Aluminum needs a primer that bonds to oxidized surfaces. Zinc-coated surfaces need primers that won't react with the coating.
Application Conditions and Curing Failures
Paint applied in the wrong conditions never cures properly. Temperature, humidity, and air movement all affect how coatings harden.
Applying paint in cold weather, high humidity, or direct sunlight causes blistering, soft film, and premature failure. The paint may look dry on the surface while remaining soft underneath. Once moisture gets trapped, delamination begins.
Environmental factors that ruin coatings:
- Temperatures below 10°C or above 30°C during application
- Humidity above 85% prevents proper moisture release
- Direct sun exposure during application causes surface skinning
- Inadequate air circulation prevents solvent release
- Applying topcoat before primer is fully cured creates weak adhesion
Proper curing requires the right temperature, humidity, and ventilation. Rushing this step is one of the fastest ways to guarantee coating failure.
Signs of Coating Failure on Metal Siding
Recognizing failure early lets you address it before damage spreads. The visible signs tell you exactly what went wrong.
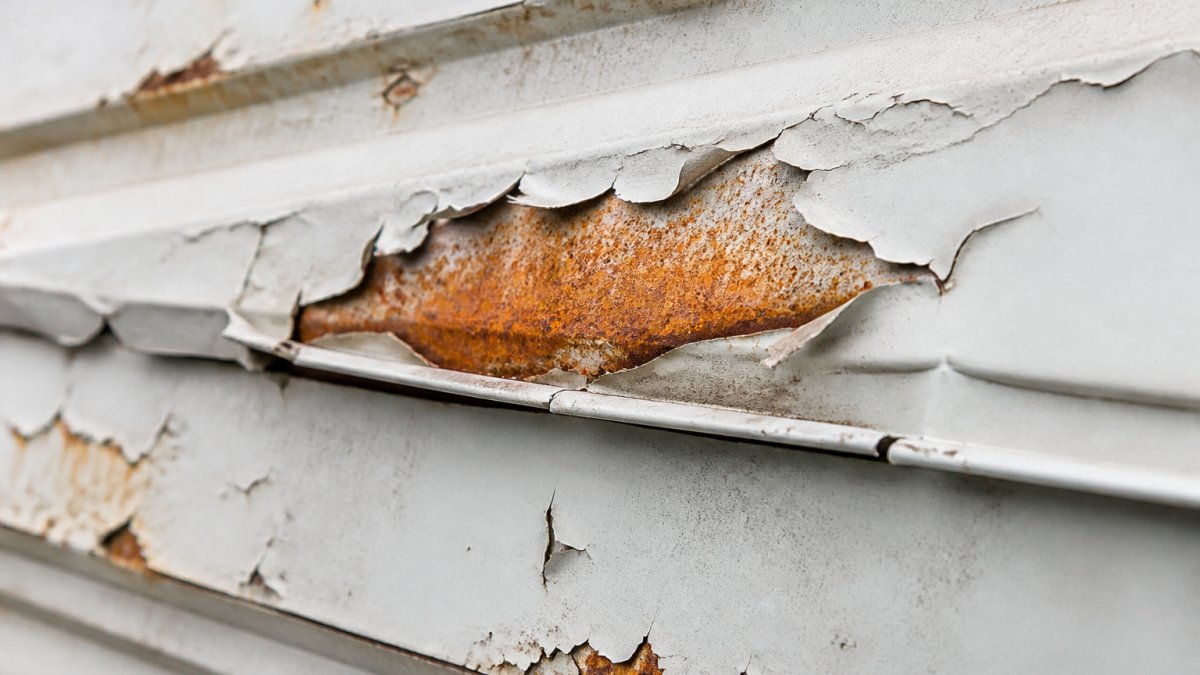
Peeling, Blistering, and Delamination
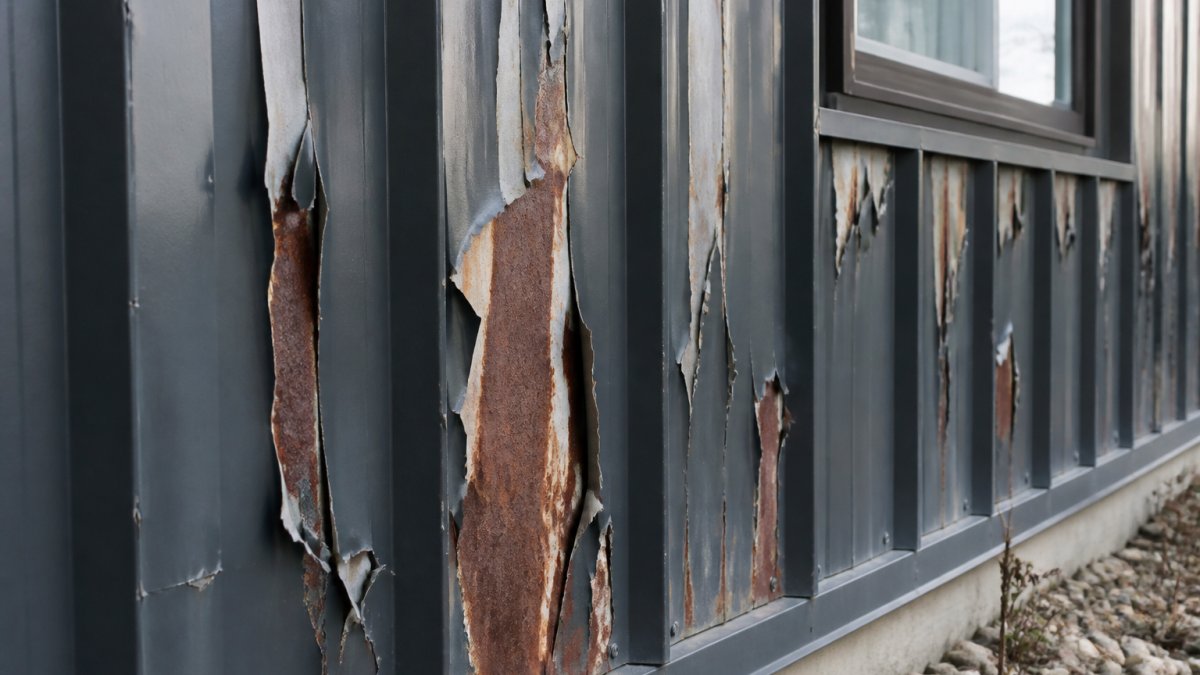
Peeling paint means the coating lost adhesion to the substrate. It typically starts at edges, seams, or fasteners where moisture can penetrate.
Blistering occurs when moisture gets trapped under the coating. The water pressure pushes the paint away from the metal, creating bubbles.
Delamination is when entire sections of coating separate from the metal. This happens when adhesion fails across a wide area, usually due to contamination or incompatible primers.
What causes peeling, blistering, and delamination:
- Poor surface preparation leaving contaminants
- Primer incompatibility with the substrate
- Moisture trapped during or after application
- Thermal expansion and contraction stressing the coating
- UV degradation of the paint film over time
These failures are visible and measurable. If you see peeling or blistering, the coating system has failed and needs removal and reapplication.
Chalking, Fading, and Corrosion Spots
Chalking is a powdery residue on the paint surface. It means the binder in the paint is breaking down due to UV exposure. The paint is literally disintegrating on the surface.
Fading indicates UV damage. The pigments in the paint are degrading. While fading is mainly cosmetic, it signals that the protective binder is also degrading.
Corrosion spots appear as rust bleeding through the coating. This means moisture has penetrated and corrosion has started underneath.
Warning signs of advancing failure:
- Chalking that wipes off on your hand
- Significant color change or fading
- Rust spots or orange discoloration showing through
- Pitting or surface degradation of the metal
- Gaps opening up at seams or fasteners
These signs develop over time. Addressing them early with maintenance prevents catastrophic failure.
Metal Siding Surface Preparation Before Painting
Proper preparation takes time. It's also where we see the biggest difference between projects that last and those that fail.
Step 1: Clean and Degrease the Substrate
Start with a thorough cleaning. Pressure washing alone isn't enough. You need to remove oil, grease, and atmospheric deposits.
Cleaning procedure:
- Pressure wash at 1500-2000 PSI to remove loose debris
- Apply a degreaser formulated for metal surfaces
- Scrub with a stiff brush to break up contamination
- Rinse thoroughly with clean water
- Allow to dry completely (minimum 24 hours in dry conditions)
- Inspect for any remaining residue or sheen
The surface should feel completely dry and look matte. Any sheen indicates remaining contamination.
Step 2: Remove Rust, Oxide, and Old Coating
Once the surface is clean, address rust and oxidation. Wire brushing works for light surface rust. For heavier corrosion, use a wire wheel on a power drill or angle grinder.
Oxide layers on bare aluminum or galvanized steel need removal. Use a stainless steel wire brush or fine-grit abrasive pad. Avoid carbon steel brushes on stainless or aluminum; they can transfer iron particles that cause corrosion.
Rust and oxide removal methods:
- Wire wheel or cup brush for moderate corrosion
- Fine-grit abrasive pads (120-150 grit) for light surface rust
- Grinding for heavy corrosion or old coating removal
- Chemical rust converters for light surface rust only (not as primary method)
Remove all loose coating. Any paint that's peeling or flaking must come off completely. A proper surface has no loose material remaining.
Step 3: Achieve Proper Surface Roughness
The surface needs texture for mechanical adhesion. Smooth, shiny metal won't hold paint. You're aiming for a dull finish with visible texture.
Surface roughness is measured in mils or microns. For metal siding, a specific surface profile gives enough texture for adhesion without being so rough that it traps moisture.
Achieving proper surface roughness:
- Use 80-120 grit abrasive for steel
- Use 120-150 grit abrasive for aluminum
- Avoid over-abrading, which creates excessive porosity
- Wipe down with a tack cloth to remove dust
- Apply primer within 4-8 hours of preparation
The surface should look matte and slightly rough to the touch. If it still has any sheen, you haven't abraded enough.
Primer Selection and Metal Substrate Compatibility
This is where specificity matters. The wrong primer dooms the entire system.
Steel substrates need rust-inhibiting primers with zinc or iron oxide.
Aluminum substrates need primers formulated for oxidized aluminum. These primers bond to the oxide layer without requiring complete removal.
Galvanized steel needs a primer compatible with zinc surfaces. Some primers won't adhere to galvanized coatings.
The primer must match both the substrate and the topcoat. Check compatibility between primer and topcoat before applying either.
Apply primer at the thickness recommended by the manufacturer. Underapplication reduces protection. Overapplication causes sagging and slow curing.
Repainting Aluminum Siding: When and How
Aluminum siding can be repainted, but the decision depends on the current coating condition.
If the existing coating is in good condition with no peeling, blistering, or rust, you can paint over it.
If the existing coating is failing, peeling, blistering, or showing rust, you must remove it completely.
When to repaint vs. replace:
- Repaint if coating failure is minor and localized
- Repaint if the underlying aluminum is sound with no pitting
- Replace if corrosion has pitted the aluminum significantly
- Replace if the coating failure is extensive across the siding
For repainting, use a primer compatible with aluminum and your chosen topcoat. Follow the same surface preparation steps: clean, degrease, and achieve proper surface roughness.
The process takes longer than initial painting because you're working around existing conditions. Budget extra time for careful preparation.
Metal Coating Maintenance and Inspection
Regular inspection catches problems before they spread. We recommend inspecting metal siding annually.
What to look for during inspection:
- Peeling or flaking paint at edges and seams
- Blistering or bubbling in the coating
- Rust spots or orange discoloration
- Chalking or powdery residue on the surface
- Cracks or gaps opening at fasteners
- Water staining or moisture marks
Document what you find with photos. This helps track whether problems are growing or stable.
Maintenance prolongs coating life. Wash the siding annually with mild soap and water to remove atmospheric deposits. Address small failures immediately before they expand.
Environmental Factors: Heat, Moisture, and UV Exposure
The environment determines how long coatings last. Metal siding faces constant exposure to temperature swings, moisture, and sunlight.
UV exposure degrades the binder in paint over time. This is why chalking and fading occur.
Moisture is the primary driver of coating failure. Water trapped under the coating causes blistering and adhesion loss.
Temperature cycling stresses the coating. Metal expands and contracts with temperature changes. Coatings must flex with the substrate.
Salt exposure (in coastal areas or areas using road salt) accelerates corrosion. Coatings in these environments need additional protection.
The environment you're in determines coating durability.
Metal siding coatings fail when the fundamentals are ignored. Metal Masters Inc. handles all phases of sheet metal and the custom fabrication of sheet metal components.
| Failure Cause | Visible Sign | Prevention Method |
|---|---|---|
| Poor surface preparation | Peeling within weeks | Clean, degrease, and abrade substrate |
| Primer incompatibility | Adhesion failure, blistering | Select primer matched to metal type |
| Moisture during curing | Soft film, bubbling | Apply in dry conditions, 10-30°C |
| UV degradation | Chalking, fading | Use UV-resistant topcoat, inspect annually |
| Rust and oxidation | Corrosion spots, discoloration | Remove all rust and oxide before priming |
| Thermal stress | Cracking, separation at seams | Use flexible topcoat, allow for expansion |
According to Canadian Standards Association guidelines on protective coatings, proper surface preparation is the single most critical factor in coating durability. Research into metal coating failures shows that NACE International's corrosion prevention standards recommend specific primer types for different metal substrates.
Frequently Asked Questions
What is the most common reason metal siding coatings fail prematurely?
Inadequate surface preparation is the leading cause of premature metal siding coating failure. Oil contamination, oxide layers, and loose rust on the steel substrate prevent the primer and topcoat from bonding properly. Even small amounts of residual grease or mill scale can trigger adhesion failure within months. Proper degreasing, rust removal, and surface roughness are non-negotiable before any coating application.
How should you prepare metal siding before applying a new coating?
Clean the surface thoroughly with a degreaser to remove all oil and contaminants. Remove rust, oxide, and old failing coating using wire brushing, grinding, or blast cleaning. Achieve an appropriate surface profile to ensure mechanical adhesion. Allow the substrate to dry completely before priming. Verify that the metal is free of dust and debris immediately before application. Proper surface preparation is critical for coating longevity.
Can you paint over rust on metal siding?
No. Painting directly over rust will fail within months because the coating cannot bond to the oxidized layer. Rust must be removed completely using grinding, wire brushing, or abrasive blasting. Once rust is gone, apply a rust-inhibiting primer formulated for bare steel. If rust has penetrated deeply, the affected section may need replacement rather than repainting. Always address the source of moisture that caused the rust first.
What environmental conditions cause coating failure on metal siding?
High humidity, temperature fluctuations, and direct UV exposure accelerate coating degradation. Applying paint in cold or damp conditions prevents proper curing, leading to blistering and poor adhesion. Extreme heat causes overapplication and film hardness loss. UV radiation breaks down the topcoat binder, causing chalking and fading. Moisture trapped under the coating triggers corrosion and delamination. Always apply coatings within the manufacturer's temperature and humidity ranges, and ensure adequate ventilation during cure.